Welcome to the Launchpad: "Easy Automate" Activity Series
This is where liberation begins. These hands-on activities are specifically designed to demystify the scripting process and prove that you can start automating today.
Follow these simple, step-by-step examples to build your first supervised automations for common office tasks. You'll quickly see:
- How Easy Setup Truly Is: We guide you through the minimal steps required to get Python running on your machine—no large investment needed!
- The Shocking Time Savings: Quantify the immediate hours you can reclaim by scripting repetitive work.
- Proof It Works: Every activity includes pre-built Python code, so you can execute the script and watch the magic happen.
If you hit a snag, don't worry! That initial setup phase is the trickiest part for everyone. We've included video walkthroughs to visually guide you past any hurdles.
For a deeper dive, join one of our Live Stream Automation Workshops. Our instructor walks through these same examples in a slow, methodical manner, addressing common beginner errors in real-time. Crucially, we dedicate time to showing you how to use AI Prompts to write 90% of the code for you, transforming you from a coder to an effective automation supervisor instantly.
When you conquer these three activities, you'll have everything in place to start automating your entire digital life.
⚠️ NOTE
You seem to be on a mobile device (or a device with a small screen)
In order to view and complete our Activity Series, you'll need to use a computer.
Please navigate to this page on your computer, and the Activity Series will appear in this space.
Initial Setup
NOTE: These steps only ever need to be completed once.
Step by step instructions
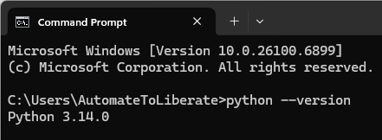
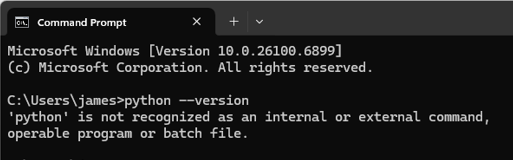
Open Command Prompt: Press the Windows Key, type
cmd, and press Enter.Check for Python: Type the following command and press Enter:
python --version-
If Python is already installed, you will see something simiar to: Python 3.14.0
-
If Python is not installed, you will likely see the message: 'python' is not recognized as an internal or external command
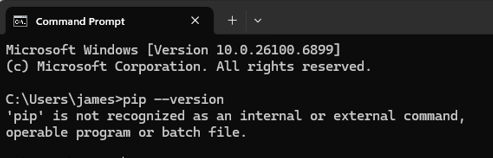
Check pip (Package Manager): You should also check the version of
pip, Python's package installer, which is installed alongside Python:pip --version-
If pip is already installed, you will see something simiar to: pip 25.2 from...

-
If pip is not installed, you will likely see the message: 'pip' is not recognized as an internal or external command
Visual steps
Step by step instructions
Download the Installer
Go to the Official Python Website: Navigate to the Python Downloads page for Windows. E.g. https://www.python.org/downloads/windows/
Select the Latest Stable Version: In our example, it was the Windows Installer (64-bit).
Download the Installer: Click the appropriate Windows installer link for your system (usually 64-bit is recommended for modern PCs). This downloads an executable file (
.exe).
Run the Installer and Enable PATH
Run the Executable: Double-click the downloaded Python installer file (e.g.,
python-3.x.x-amd64.exe).Crucial Step - Enable PATH: On the very first installation screen, BEFORE clicking "Install Now" or "Customize installation," ensure you check the box at the bottom that says "Add python.exe to PATH". This step is vital as it allows you to run Python and its package manager,
pip, from any command prompt window.Choose Installation Type:
For a simple, default installation with common features, click "Install Now" (recommended for beginners).
Alternatively, you can click "Customize installation" to select specific features or change the installation location, but ensure "Add python.exe to PATH" remains checked.
Complete Installation: Allow the installation process to finish. Once complete, you should see a "Setup was successful" message.
Verify the Installation and PATH Update
Open the Command Prompt: Click the Start menu, type
cmd, and press Enter to open the Command Prompt.Check Python Version: In the Command Prompt, type the following command and press Enter:
python --versionIf the installation and the PATH update were successful, you'll see the installed Python version (e.g.,
Python 3.14.0).Check pip (Package Manager): You should also check the version of
pip, Python's package installer, which is installed alongside Python:pip --versionIf you see a version number for
pip, your installation is complete and ready to use!
NOTE:
⚠️ INSTALLATION TIP
If you're on a corporate network or do not have administrator rights to install software, you may be blocked from installing Python directly.
In this case, consider using WinPython, which is a portable version of Python (and includes popular scientific packages). It does not require any installation and can be run directly from a folder, such as on a USB drive or your local documents.
Visual steps
Step by step instructions
Open Command Prompt: Press the Windows Key, type
cmd, and press Enter.Install the libraries: Type the following command and press Enter:
pip install pyautogui pyperclip pypdf fpdf2 requests
NOTE: This is only required if you want to use a more advanced text editor for your scripting. For completing these activities, the default Notepad application (which should already be installed on your system) will be more than sufficient.
Visual steps
⚠️ Disclaimer: Focus on Function, Not Form
The Python scripts provided in the Starter Activities are designed for demonstration and immediate execution, showcasing the practical power and ease of use of automation and data handling.
The code does not conform to best practice, and is not intended to. We have tried to use minimal lines to demonstrate the desired result. Along this journey you will learn how to use AI Prompts to help you compile your scripts, which will provide you with results that do confrom to best practice.
The goal is inspiration, not instruction in code architecture.
Automated PDF Invoice Data Extraction 🚀
In this activity, you'll learn how to automatically inspect a list of PDF files, pull out specific invoice information, and store it in a CSV file that you can open in Excel or import into another system.
Try the steps manually first to see how long it takes, then use our simple sample script to experience the time savings!
Download the zip archive containing 10 sample PDF invoice documents: Download
Extract the 10 invoices from the zip file directly into your Downloads folder.
Create the script file:
Open Notepad (or your text editor).
Copy and paste the full Python script code into the blank document.
import os
from pypdf import PdfReader
import csv

all_invoice_data = [["COMPANY","ADDRESS","PHONE","EMAIL","INVOICE_NO","TOTAL"]]
SEARCH_LABELS = ["Company:","Address:","Phone:","Email:","Invoice No.","TOTAL"]
for filename in os.listdir('.'):
    if filename.lower().endswith(".pdf") and 'SBS Invoice' in filename:
        pdf_reader = PdfReader(filename)
        page_text = pdf_reader.pages[0].extract_text()

        invoice_values=[]
        for label in SEARCH_LABELS:
            start_index = page_text.find(label)
            extraction_start = start_index + len(label)
            break_index = page_text.find("\n", extraction_start)
            invoice_values.append(page_text[extraction_start:break_index].strip())

        all_invoice_data.append(invoice_values)

with open('output_sbs_invoice_data.csv', 'w', newline='', encoding='utf-8') as csv_file:
    csv_writer = csv.writer(csv_file, delimiter=',')
    csv_writer.writerows(all_invoice_data)
    print("File output_sbs_invoice_data.csv was generated in the current directory.")
Go to
File->Save As...Navigate to your Downloads folder.
Set the "Save as type" to All Files (
*.*).Save the file exactly as
check_pdfs.py.
Before running the script, try extracting the required data from the 10 PDF invoices yourself and compiling it into a spreadsheet. This will establish a baseline to compare against the script's speed.
We want to extract the below data points from each of the files:
Open Command Prompt: Press the Windows Key, type
cmd, and press Enter.Navigate to your files: Type the following command and press Enter to move to the folder where your files are:
cd %userprofile%/downloadsExecute the script: Run the automation by typing the command below and pressing Enter:
python check_pdfs.pyThe Command Prompt should print: "File output_sbs_invoice_data.csv was generated in the current directory."
Go to your Downloads folder.
Find and open the new file,
output_sbs_invoice_data.csv, in Excel or a similar program.Observe the result: All the invoice data from the 10 PDFs has been extracted and organised for you instantly!
You'll see that the script instantly extracted all the required data! Compare this to your manual effort—imagine the time saved and the complete elimination of copy/paste errors as the number of invoices grows.
Data Entry Automation 🐍
In this activity, we'll demonstrate how you can stop manually copying and pasting! The script will automatically read data from a source document (like a spreadsheet or log file) and input that data into an application form. This is a great way to speed up the process and eliminate typos.
Try the steps manually first to see how long it takes, then use our simple sample script to experience the time savings!
Click the link below to download the data file. Download
Ensure the downloaded file is present in your Downloads folder.
Create the script file:
Open Notepad (or your text editor).
Copy and paste the full Python script code into the blank document.
import pyperclip
import csv
import pyautogui
import time

print("Script paused until you click in the 'Company' data entry field on the mock CRM form.")
while True:
    check=pyperclip.paste()
    if check=="ready_to_go":
        pyperclip.copy(' ')
        break

chooser_x, chooser_y = pyautogui.position()

with open('input_form_data.csv', 'r', newline='') as csv_file:
    csv_reader=csv.reader(csv_file)
    next(csv_reader)
    start=time.time()
    for data_row in csv_reader:
        input_data=[]
        input_data.append(data_row[0])
        input_data.append(data_row[2].split(",")[0])
        input_data.append(data_row[2].split(",")[1].strip().split(" ")[0])
        input_data.append(data_row[2].split(",")[1].strip().split(" ")[1])
        input_data.append(data_row[2].split(",")[1].strip().split(" ")[2])
        input_data.append(data_row[1].split(" ")[0])
        input_data.append(data_row[1].split(" ")[1])
        input_data.append(data_row[3])
        input_data.append(data_row[4])

        pyautogui.write(input_data[0])
        for data_item in input_data[1:]:
            pyautogui.press(['tab'])
            pyautogui.write(data_item)

        pyautogui.press(['tab'])
        pyautogui.press(['enter'])

        pyautogui.click(x=chooser_x, y=chooser_y)

    pyperclip.copy(' ')
    print("Automation Complete. Total time: {} seconds.".format(int(time.time()-start)))
Go to
File->Save As...Navigate to your Downloads folder.
Set the "Save as type" to All Files (
*.*).Save the file exactly as
form_data.py.
Before running the script, manually enter the data from the form_data.csv file (downloaded in Step 1) into the mock CRM form at the bottom of this page to establish a baseline for comparison with the script's speed.
Open Command Prompt: Press the Windows Key, type
cmd, and press Enter.Navigate to your files: Type the following command and press Enter to move to the folder where your files are:
cd %userprofile%/downloadsExecute the script: Run the automation by typing the command below and pressing Enter:
python form_data.py-
The script will pause until you click into the 'Company' data entry box in the mock CRM form at the bottom of the page.
⚠️ CRITICAL WARNING
The script is designed to take control of your keyboard and mouse. It will start typing and clicking immediately after you click the first form field. Do not touch your keyboard or mouse until the script is finished (it will enter 10 records in total)!
If anything goes wrong, or you need to stop it immediately, simply move your mouse cursor to the very top-left corner of your screen. This is a built-in "emergency stop" for the script.
The script will stop automatically after submitting our 10 sample records.
Watch as the script automatically enters all the data records into the form one by one. It will be incredibly fast!
When the script is finished, it will stop typing, and you should see a message in the Command Prompt should print Automation Complete. Total time: x seconds..
Congratulations! You've just performed your first automated data entry job, saving a lot of time and ensuring perfect accuracy!
Automated PDF Receipt Generation ✨
In this activity, you'll learn how to automatically generate multiple PDF receipt files, pulling data out of an Excel/CSV file to populate the receipts.
Try the steps manually first to see how long it takes, then use our simple sample script to experience the time savings!
Download the csv file contaning the receipt data and the company logo for diaplying on the receipts. Download Data
Download Logo
Create the script file:
Open Notepad (or your text editor).
Copy and paste the full Python script code into the blank document.
from fpdf import FPDF
from fpdf.enums import XPos, YPos
from fpdf.fonts import FontFace
import csv
from datetime import date

with open('input_pdf_receipt_data.csv', 'r', newline='') as csv_file:
    csv_reader = csv.reader(csv_file)
    next(csv_reader)
    for data_row in csv_reader:
        pdf = FPDF()
        pdf.add_page()
        pdf.set_font("helvetica", size=20)

        pdf.set_fill_color('#1C2A38')
        pdf.rect(0, 0, pdf.w, pdf.h/8, style="F")
        pdf.set_fill_color(255,255,255)

        pdf.image("sbs_logo.png", w=50)

        pdf.set_text_color(255, 255, 255)
        pdf.set_xy(60,pdf.h/16-2)
        pdf.cell(text="Simple Business Services - Tax Receipt")

        pdf.set_text_color(0, 0, 0)
        pdf.set_font("helvetica", size=12)
        pdf.ln(30)
        pdf.cell(0, 10, "Receipt No. {}".format(data_row[20]), 0, new_x=XPos.RIGHT, new_y=YPos.TOP, align='R')
        pdf.ln(8)
        pdf.cell(0, 10, "Date: {}".format(date.today().strftime("%d/%m/%Y")), 0, new_x=XPos.RIGHT, new_y=YPos.TOP, align='R')
        pdf.ln(20)

        text_with_breaks = "From\nSimple Business Services\n123 Nowhere Rd\nMELBOURNE VIC 3000\nJohn Doe"
        pdf.multi_cell(w=pdf.w/2, h=5, text=text_with_breaks, border=0, new_x=XPos.RIGHT, new_y=YPos.TOP, align="L")
        text_with_breaks = "Bill To\n{}\n{}\n{}".format(data_row[0],"{}\n{}".format(data_row[2].split(",")[0], data_row[2].split(",")[1].strip()), data_row[1])
        pdf.multi_cell(w=pdf.w/2, h=5, text=text_with_breaks, border=0, new_x=XPos.RIGHT, new_y=YPos.NEXT, align="L")
        pdf.ln(20)

        blue= (0, 0, 255)
        grey= (235, 235, 235)

        with pdf.table(headings_style=FontFace(emphasis="ITALICS", fill_color=grey), borders_layout="SINGLE_TOP_LINE") as table:
            header_row = table.row()
            header_row.cell("QTY")
            header_row.cell("DESCRIPTION")
            header_row.cell("UNIT PRICE")
            header_row.cell("AMOUNT")
            total = 0
            for i in range(0, 5):
                item_row = table.row()
                item_row.cell(data_row[6 + (i * 3)])
                item_row.cell(data_row[5 + (i * 3)])
                item_row.cell("${}.00".format(data_row[7 + (i * 3)]))
                total += int(data_row[6 + (i * 3)]) * int(data_row[7 + (i * 3)])
                item_row.cell("${}.00".format(str(int(data_row[6 +(i * 3)]) * int(data_row[ 7 + (i * 3)]))))

            total_row = table.row()
            total_row.cell('TOTAL', border="TOP")
            total_row.cell('', border="TOP")
            total_row.cell('', border="TOP")
            total_row.cell("${}.00".format(total), border="TOP")
            bottom_row=table.row()
            bottom_row.cell('', border="TOP", colspan=4)

        pdf.cell(0, 10, 'Thank you for your business!', 0, new_x=XPos.RIGHT, new_y=YPos.TOP, align='R')
        pdf.ln(20)
        pdf.cell(text = "NOTES:")
        pdf.cell(text = "There are no notes for this invoice!")

        pdf.output('OUTPUT-RECEIPT-{}-{}.pdf'.format(data_row[20],data_row[0]))

print("10 Sample PDF Receipts were created in the current directory.")
Go to
File->Save As...Navigate to your Downloads folder.
Set the "Save as type" to All Files (
*.*).Save the file exactly as
pdf_create.py.
Before running the script, try using the data downloaded in Step 1 to create a sample receipt for each customer. This will establish a baseline to compare against the script's speed.
Open Command Prompt: Press the Windows Key, type
cmd, and press Enter.Navigate to your files: Type the following command and press Enter to move to the folder where your files are:
cd %userprofile%/downloadsExecute the script: Run the automation by typing the command below and pressing Enter:
python pdf_create.pyThe Command Prompt should print: "10 Sample PDF Receipts were created in the current directory."
Go to your Downloads folder.
Find and open one of the new PDF Receipts (file names begin with OUTPUT-RECEIPT).
Observe the result: All the 10 PDF Receipt files have been created for you instantly!
You'll see that the script instantly populated all the required data! Compare this to your manual effort—imagine the time saved and the complete elimination of copy/paste errors as the number of receipts grows.
Fetch Data from an External API 💻
In this activity, you'll practice using Python's libraries to make API calls and retrieve data from an external web service. This skill is fundamental for integrating your scripts with other systems.
Try the steps manually first to see how long it takes, then use our simple sample script to experience the time savings!
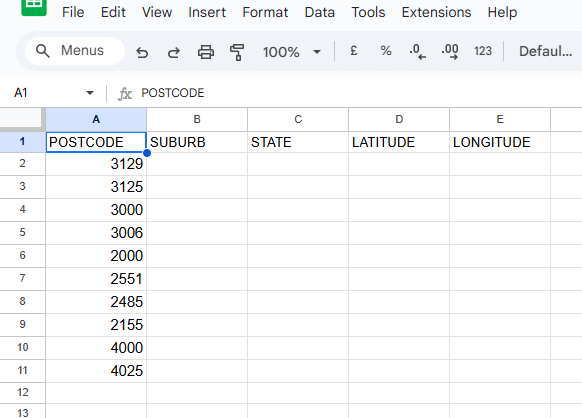
Download the csv file containing the 10 sample postcodes requiring enrichment: Download
Create the script file:
Open Notepad (or your text editor).
Copy and paste the full Python script code into the blank document.
import requests
import csv

output_data = [["POSTCODE","SUBURB","STATE","LATITUDE","LONGITUDE"]]

with open('input_postcode_data.csv', 'r', newline='') as csv_file:
    csv_reader=csv.reader(csv_file)
    next(csv_reader)
    for data_row in csv_reader:

        postcode = data_row[0]
        url = "http://v0.postcodeapi.com.au/suburbs/{}.json".format(postcode)

        response = requests.get(url)

        if response.status_code == 200:
            data = response.json()
            output_data.append([postcode, data[0]['name'], data[0]['state']['abbreviation'], data[0]['latitude'], data[0]['longitude']])
        else:
            print(f"Error: {response.status_code} - {response.text}")

with open('output_postcode_data.csv', 'w', newline='', encoding='utf-8') as csv_file:
    csv_writer = csv.writer(csv_file, delimiter=',')
    csv_writer.writerows(output_data)
    print("File output_postcode_data.csv was generated in the current directory.")
Go to
File->Save As...Navigate to your Downloads folder.
Set the "Save as type" to All Files (
*.*).Save the file exactly as
api_data.py.
Before running the script, try finding and compiling the enriched postcode data into a spreadsheet. This will establish a baseline to compare against the script's speed.
We want to find and populate the missing data points for the below postcodes:
Open Command Prompt: Press the Windows Key, type
cmd, and press Enter.Navigate to your files: Type the following command and press Enter to move to the folder where your files are:
cd %userprofile%/downloadsExecute the script: Run the automation by typing the command below and pressing Enter:
python api_data.pyThe Command Prompt should print: "File output_postcode_data.csv was generated in the current directory."
Go to your Downloads folder.
Find and open the new file,
output_postcode_data.csv, in Excel or a similar program.Observe the result: Enriched data about the postcodes has been retrieved and collated for you instantly!
You'll see that the script instantly pulled all the required data! Compare this to your manual effort—imagine the time saved and the complete elimination of copy/paste errors as the number of data points grows.
✅ Next Steps: Applying Automation to Your Workflow
The Starter Activities you completed were a direct demonstration of how simple and accessible it is to execute your own Python scripts.
If you found these activities straightforward, that's great! You've proven that getting a machine to execute a task isn't scary or overly complex—it's a process you can now manage. If you found them challenging, that's completely normal too, and you're certainly not alone. The most important thing is that you're taking these first steps. Remember, we are here to support you, so please reach out to us for help if you're feeling stuck!
Transitioning to Impact: The Code Barrier is Breaking
For a long time, the main excitement has been around how simple it is to execute Python scripts to automate work, while the act of writing the actual code was the hard part—the real skill barrier.
But here's the game-changer: that is no longer the case.
The next stage of the program focuses on building your confidence and skills so you can leverage AI Prompts to construct custom scripts with your specific business logic. AI Prompts can now help you so much with the coding that the barrier to entry for automation has practically disappeared.
Ready to stop trading time for money? Pick your next step to begin applying these principles directly to your own business challenges:
| Your Goal | Recommended Program(s) | How It Helps You Become Self-Sufficient |
|---|---|---|
| I need a detailed walkthrough to better undestand these Starter Activities. | Live Stream Workshops | Join our structured, real-time sessions where we walk through the Starter Activities in detail, ensuring you nail your first automation wins. These workshops don't just teach theory; they introduce the core concept of using powerful AI Prompts to handle up to 90% of the script generation for you. |
| I need personalised, hands-on guidance for my specific projects. | Automation Buddy Program / Automation QuickFix Consultation | This is dedicated one-on-one coaching designed to ensure you succeed. Your Automation Buddy helps you navigate two key challenges: providing expert consultation on how to best approach and structure your next major time-draining task, and, crucially, helping you debug stubborn errors in your automation scripts. |